Contracting Guide
As I begin to design a home for someone the question of being your own contractor is often asked. “Why not contract my own home and save a general fee of 10% to 15%”. This would be a significant savings. To answer this question let’s discuss what a contractor does.
What Does a Contractor Do
A contractor will supervise and coordinate the construction of your home. Sounds easy so what does that involve? Let’s step through the typical home construction process and see where the contractors services would be used.
- Find a lot to build on: As you look to purchase a building lot it’s important to understand what improvement may be needed before a building permit can be issued. Sometimes a parcel of land may not be ready for a residence to be constructed on it. It may need road and or utility upgrades. High water tables may need to be mitigated. Check with the local jurisdiction to make sure a parcel is buildable before you purchase it. Steep slopes will likely increase construction costs as well as landscaping costs.
- Obtain Construction plans: Coming up with a set of construction plans that meet your needs is often done with the help of a Home Designer or Architect. Some of the benefits of involving a qualified contractor are they know what methods of construction are typically used in the area you plan to build and they can help you obtain a plan that will fit your budget. One of the benefits of providing your own construction plans through and independent Home Designer is the ability to shop contractors after you have complete plans.
- Obtain a building permit: Depending on the jurisdiction you are building in this can be as simple as paying a fee, but is often much more involved. Most jurisdictions will require you to provide the license number and contact information for your General contractor, Electrical Subcontractor, HVAC Subcontractor, Plumbing Subcontractor and sometimes more.
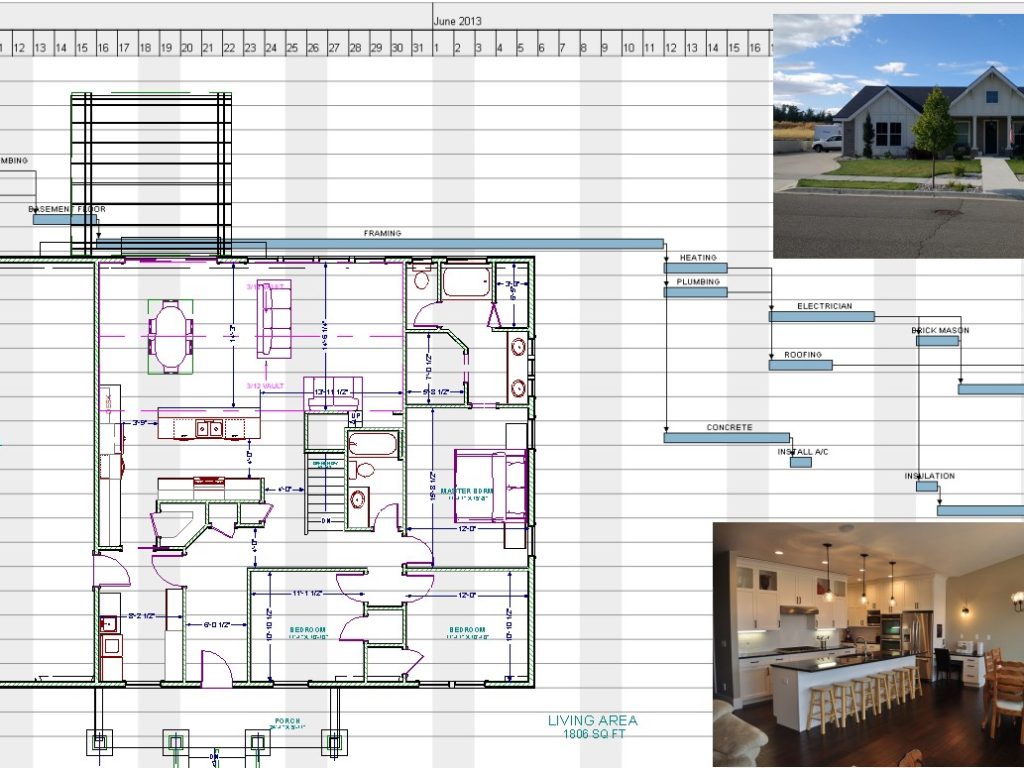
- Supervise Construction: This is where it gets much more involved. While each home is unique in the required construction process I am going to lay out the typical list of tasks below. This will be with the assumption of standard Wood Construction. The list does not include every possible item or task that will need to be accomplished for every home, but attempts to lay out the most common task. It should be noted that the order of some items may be changed and many tasks can be done concurrently with others. Scheduling is a critical aspect of completing a home in a timely manner.
- Temporary Power: Power source to be used during construction.
- Stake out corners of home: This can be done with the use of survey equipment or with a few long tape measures and a level.
- Trackout Mat Installation:
- Scrape Lot: Remove top soil in the construction area and save for future landscaping needs.
- Re-stake the corners: Once the topsoil is removed you must re-stake the corners in order to accurately dig for the foundation.
- Excavate for footings and foundation: Usually this is done with a large excavator.
- Re-stake the corners: After Excavation We again need to locate the corners of the home. This is again done with survey equipment or tape measures and levels.
- Stub Utilities: This step can be completed after the footing and foundation are poured, but is typically easier to do before.
- Place footings: The typical footing is constructed out of concrete. They are constructed by building a form placing rebar in the correct locations per the plans and pouring the concrete into the forms.
- Pouring foundations:
- Underground Plumbing: If the home will have a basement or its a slab on grade home all the plumbing on the lowest level will need to be roughed in before the floor is poured. If the home has a crawl space this may be accomplished after the home is framed up, but some plumbers will still choose to do this before framing.
- Under Slab Heating: Sometimes the heating ducts are run under the slab, if this is the case it should be coordinated with the underground plumbing.
- Radon Mitigation Rough in:
- Gravel Under Slab: Place gravel under the slab as well as setting forms as required.
- Radiant heating Pipes in slab:
- Pour Lower Floor:
- Framing:
- Backfill Foundation & Rough Grade: The foundation is often backfilled before or during the framing process, but caution must be taken to ensure the foundation is properly supported before it is backfilled. For a basement the framed floor supports the top of the wall and the foundation can tip into the home if the floor is not installed.
- Roof Underlayment:
- Install Exterior Doors:
- Install Windows:
- Shore and Pour Suspended Slabs: Suspended slabs are often poured during the framing process. Usually after the floors are framed at the same level as the slab.
- Rough Plumbing: This may be going on at the same time as Rough Heating, and needs to be coordinated with heating duct locations.
- Rough Heating: This may be going on at the same time as Rough Plumbing, and needs to be coordinated with Plumbing runs.
- Rough Electrical:
- Rough Low Voltage: This may include telephone lines, networking wiring, home theater wiring, whole home sound system wiring, security system and more.
- Permanent power to Home:
- Gas Connection:
- Roofing:
- Insulation:
- Sheetrock:
- Hang Interior Doors:
- Trim Work: Trim Work includes Casing around Doors And Windows as well as building shelves in closets.
- Install Railing: Install any railing. Some people prefer to install the railing after painting.
- Painting:
- Hard Flooring Installation: Tile and Wood Flooring installation:
- Tub and Shower Surrounds:
- Cabinet Installation: Depending on the flooring type the cabinets may need to be installed before the flooring.
- Countertop Installation:
- Finish plumbing:
- Finish Electrical:
- Finish Heating:
- Install Door Hardware:
- Exterior Siding: Typically the exterior siding can be started after the rough electrical is complete.
- Exterior Concrete: Exterior concrete can be completed once the rough grading is complete, but is often not done until near the end of construction to avoid being damaged by subs.
- Install HVAC Compressors: The typical compressor is part of the cooling system of the home or in the case of a heat pump it is utilized for heating and cooling. The compressor is often installed on a concrete or composite pad.
- Final Grading:
- Landscaping:
- Inspections: Inspections are required by most jurisdictions. During the construction process several items will need to be inspected depending on your local requirements.
- Footing Inspection: Check distances from property lines, rebar placement Electrical ground attached to rebar.
- Utility Connections:
- Foundation Wall inspection:
- Underground Plumbing and other Utilities under the slab:
- Radiant piping Test: For radiant in slab heating if used.
- Nailing Inspection:
- Weather Barrier:
- Four way inspection: Framing, HVAC, Plumbing & Electrical
- Insulation: Must be inspected before sheetrock installed.
- Sheetrock Attachment:
- Final Inspection:
Contracting Your Own Home
Now we have an overview of how to contract Your Own Home. Many people have successfully contracted their own homes and saved much of the contracting fee, unfortunately I have also worked with many people who have gotten into trouble during the construction phase. So lets discuss some of the more common problems that arise. These issues are not isolated to those contracting their own home, but tend to be avoided by an experienced contractor.
- Underestimated the Budget: Too often homeowners get partway through the construction process and the cost overages begin to take over the budget, leaving insufficient funds to complete the project as planned.
- Extended Construction Time: Gaps in the schedule create unproductive times during construction and extend the overall construction time. Subcontractors going over there allotted time can push other subcontractors back and require rescheduling.
- Subcontractors not completing all tasks: I often see a tendency for subcontractors to ask that someone else complete a task that should likely be completed by them, especially when they know their customer may not be as familiar with the process. When there is a problem everyone tends to point to someone else and say it’s not their responsibility. It’s important to lay out exactly what each subcontractor will be required to accomplish to avoid this issue.
- Obtaining Subcontractors: In an area where construction is thriving subcontractors tend not to be looking for new work. When you have only one project, you will often become a low priority.
- Bulk Discounts: Contractors are able to get better prices on construction materials as well as labor costs through bulk purchasing. When the construction industry is busy, I have seen Owner Contractors unable to get subcontractors to work on their projects.
Choosing a Contractor
Choosing a qualified contractor will likely be the most important decision in the success of you new home. Take the time to interview and get to know your contractor of choice to ensure you have chosen a competent and trustworthy contractor to build your new home.